AUTODESK 3DS MAX
.jpg)
3DS MAX, A 3D modeling, animation, and rendering software. 3D modeling software provides a comprehensive modeling, animation, simulation, and rendering solution for games, film, and motion graphics artists or interior designer.
.jpg) |
| Game character modeling |
.jpg) |
| Motion graphic |
.jpg) |
| Interior design |
We have learn some basic of 3Ds max from our lecturer Mr. Kenneth in 7 weeks as a short semester. There are many features in 3Ds max and it is very interesting.
1. ALT + W
 |
| In 3ds max, there are many view u can adjust when you modeling an object. This one is perspective view and you can turn 360 degree using the box at the top of right hand side. |
 |
| For more easier to view the top, front and side, press the keyboard ( ALT + W ). Then it will pop out 3 more view and make us more easier to check our object.
2. BASIC GEOMETRY
|
 |
| There some basic geomtry in 3ds max and we can find it at CREATE - GEOMETRY - then choose the geometry you want at the list. |

 |
| There are some button we often use, as the figure show- we use the 1st button to draw a square and select the part we want, 2nd button is move the object ( W ), 3rd button is rotate the object ( R ), and the 4th button is change the size of object ( E ) Those button are always use when create something.
3. CONVERT TO EDITABLE POLY
Convert to editable poly is let your geometry or object going to next level and we can adjust it, change its shape, and also the 1st way before you model your object.
|
 |
Right click your object- go convert to - CONVERT TO EDITABLE POLY After that, you can see your modify list have increase a editable poly, and at the below there are some button use to reshape the object. After that, you can see your modify list have increase a editable poly, and at the below there are some button use to reshape the object.      EXTRUDE  OUTLINE  INSET BEVEL   My 1st 3ds max Model 
4. EDGE
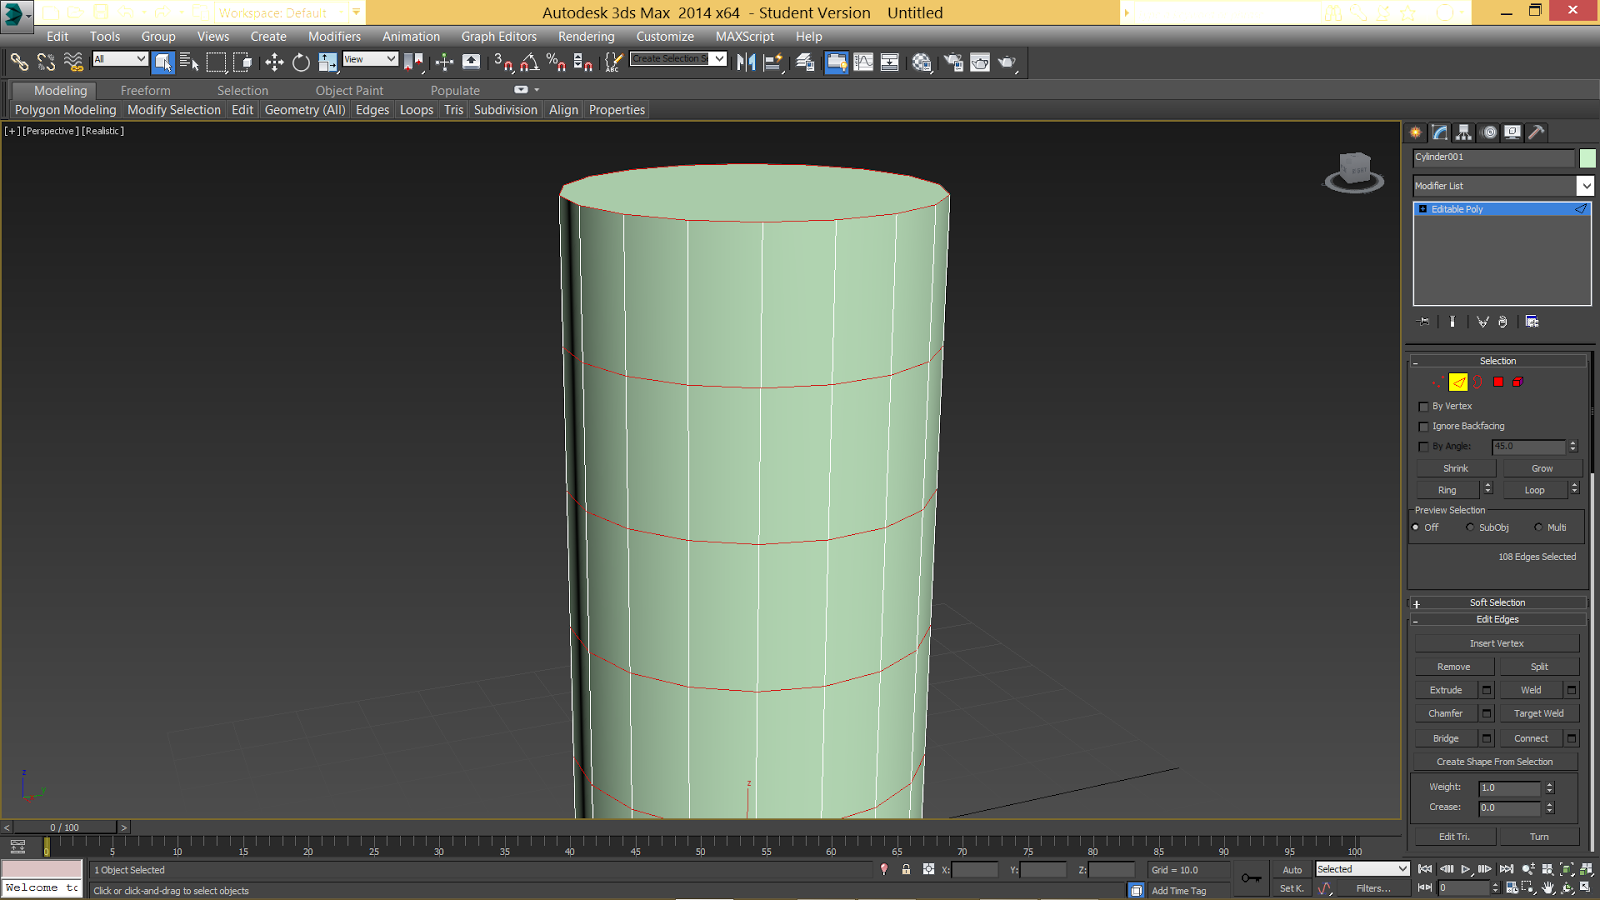
After the basic of selection and edit polygon, lecturer teach us how to use the edge as well as good. There some details in using edge like ring, loop, chamfer and connect.
RING
 LOOP

After use edge selection, click loop and we get this.
CONNECT

Connect is build one or more line in object, so we can adjust the object more details.
We can use edge and ring and connect then we get a line like the figure above.
CHAMFER
 
The Chamfer modifier lets you add edges procedurally to specific parts of an object with an option for generating quadrilateral output. It can be applied at all sub-object levels and is typically used for rounding off sharp corners, but can be applied in other situations where additional mesh resolution is required.
TURBO SMOOTH
 
The TurboSmooth modifier, like Mesh Smooth, smoothes geometry in your scene

TurboSmooth lets you subdivide the geometry while interpolating the angles of new faces at corners and edges, and apply a single smoothing group to all faces in the object. The effect of TurboSmooth is to round over corners and edges as if they had been filed or planed smooth.
CAN

A can i try to model used connect, chamfer and turbo smooth.
TIRE
 
After understood the geometry, editable poly, connect, chamfer, turbo smooth and etc, i try to go www.youtube.com and find the tire tutorial and completely it smoothly.
5. LOFT
Loft objects are two-dimensional shapes extruded along a third axis. You create loft objects from two or more existing spline objects. One of these splines serves as the path. The remaining splines serve as cross sections, or shapes, of the loft object. As you arrange shapes along the path, 3ds Max generates a surface between the shapes.
    the width, dimension same with the rectangle we draw.  
6. AUTOKEY
To start creating animation, first turn on the Auto Key button, use the time slider to go to a particular frame, and then change something in your scene. You can animate the position, rotation, and scale of an object, and almost all other settings and parameters.
 To begin animating an object:
7. BLUEPRINT

Blueprint is a technique to help us more easily and accurate to model an object like car, gun, GUNDAM and etc. It basically has TOP, FRONT, BOTTOM, SIDE to support us for model.
.jpg) .jpg)  1st, go online search the blueprint that we want then go photoshop separate them and crop it as accurate as good.   Open the Materials window (Shortcut M). Click the small box next to diffuse (right) this will open a new window (below). Double click on “Bitmap” to take you to an “Open file” window. Navigate through your file and find you blueprints then double click on one of them. 
Now you have your blueprints in 3ds Max change the name of the material (for the front image call the material and change the Self Illumination to 100 (see left). Repeat this for each of the views.
 After material the plane, if the view seem like wrong or rotated, go maps and click the long bar beside the diffuse colour. After material the plane, if the view seem like wrong or rotated, go maps and click the long bar beside the diffuse colour.  After that change the W angle to 90 degree, so we can see the blueprint After that change the W angle to 90 degree, so we can see the blueprint
return to the view that we want.
 Repeat the step for every view, then we get this. Repeat the step for every view, then we get this. ( online sample ) After that, use the skill that we learned before, ( online sample ) After that, use the skill that we learned before,
step by step model out the car.
.jpg) ( online sample ) ( online sample )FINAL PROJECT :MODELING CHARACTER
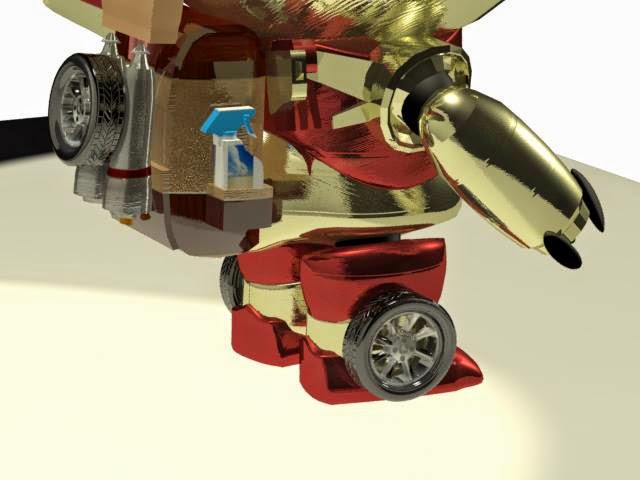
After we learned the basic, we have to model our own character as final assignment. Lecturer also show us some modeling that create by some artist, different type of character. Besides, we can model character from online blueprint such as iron man, car, gun or plane, and we also can design our own character and model it depend on our idea.
So, i choose the 2nd type that design the character myself, so i start to research some character and thinking what type of character i want to design and finally i was going to model a cute robot. this is because people are nowadays more interest to a cute thing or humor thing like BIG HERO, MINIONS, THE PENGUIN. And build a humor character is my 1st concept also. There are many type of robot and i was going to design a cute robot CLEANER. So, i start to gather the information/structure of a robot and sketch them out before i start to model. Reference .jpg)
robot concept
.jpg)
robot concept 2
.jpg)
robot spare tire
.jpg)
broom
.jpg)
tissue
.jpg)
rocket as the robot turbo
.jpg)
febreze
.jpg)
wings big hero

eye robot
  
|


没有评论:
发表评论